Clean Water, Clear Light: Building Luminous Watercolor Washes
A watercolor wash looks effortless only after water, pigment, paper, and timing begin to cooperate. Until then, the same mixture can dry as a smooth field, a hard-edged stripe, a cauliflower bloom, or a dull patch. The medium is sensitive, but it is not unknowable. Most results can be traced to how wet the paper was and how much liquid sat in the brush.
Practice washes separately from finished paintings. A dedicated sheet lets you observe the material without asking every experiment to become a picture.
Read the shine on the paper
Watercolor paper moves through visible stages. Freshly flooded paper is glossy and mobile; pigment travels quickly. Damp paper has a soft sheen and produces controlled, feathered edges. Nearly dry paper looks matte and holds a sharper mark.
Wet three small rectangles with clean water. Paint into the first immediately, wait thirty seconds before touching the second, and wait until the third has almost lost its shine. Keep the pigment mixture identical. The different edges will show you more about timing than a written rule can.
Pull a wash with a consistent bead
For a flat wash, tilt the board slightly. Load a broad brush generously and paint one horizontal stroke. A bead of liquid should gather along its lower edge. Reload the brush, touch that bead with the next stroke, and continue downward. Work steadily; returning to an area that has started drying creates seams.
At the bottom, lift excess liquid with a clean, damp brush. Then leave the page alone. Many uneven washes become calmer while drying, and repeated corrections often cause more damage than the original variation.
Plan light as untouched paper
Transparent watercolor cannot restore the brightness of clean paper after a dark passage covers it. Before the first wash, identify the largest light shape and a few smaller accents worth preserving. They do not need to remain pure white; a pale warm or cool tint can still function as light.
Think in broad value stages: first atmosphere, then middle-value forms, then selected darks. This order keeps the painting open and prevents you from describing isolated objects too early.
Glaze only when the layer is truly dry
A glaze is a thin transparent layer placed over dry paint. It can shift temperature, deepen a shadow, or connect several shapes. Mix enough color before starting, test it on scrap paper, and use as few strokes as possible. If the underlayer lifts, either the paper is still damp, the brush is too dry and abrasive, or the pigment underneath is easy to reactivate.
Two or three purposeful glazes usually create more clarity than many hesitant layers. Let each pass have a job: cool the distance, warm the foreground, or unify a shadow family.
Use hard, soft, and lost edges together
Hard edges describe contact and attract attention. Soft edges suggest atmosphere or gradual turning. Lost edges allow neighboring shapes to merge. A painting made only from hard edges can feel cut out; one made entirely from soft edges may lack structure.
Choose the edge while the shape is still wet. To soften one side, rinse the brush, remove excess water, and touch the clean damp tip along that boundary. Avoid circling the whole form. Selective softness is more convincing than a uniformly blurred outline.
Make texture serve the subject
Dry brush can suggest grass, stone, or weathered fabric. Lifting can create mist and reflected light. Granulating pigments can animate skies and rock. Splatter adds broken marks. These effects are strongest when they occur in a few relevant areas rather than across the entire page.
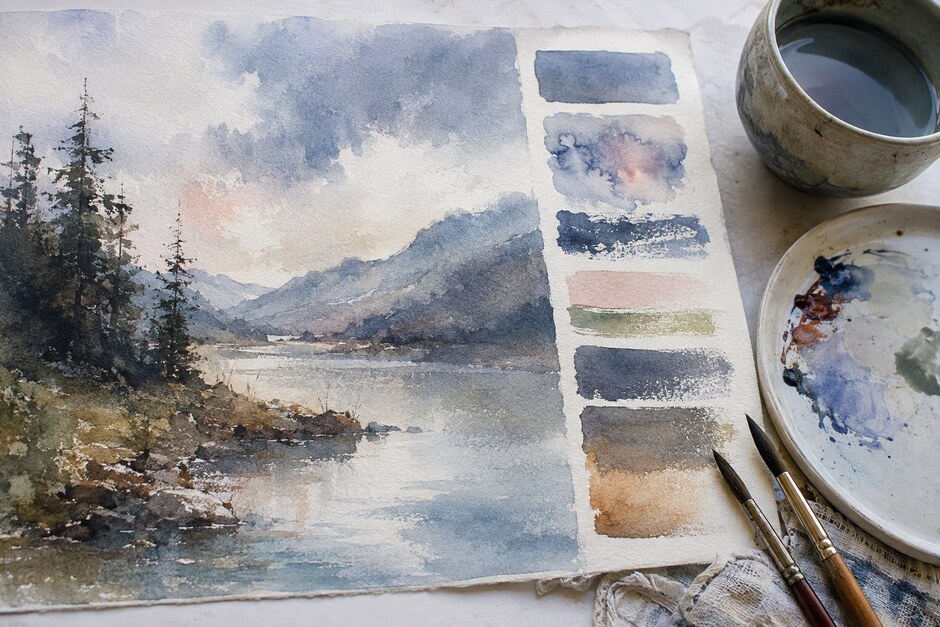
Create a texture strip beside each study and write down the paper state and tool after it dries. The note matters because a dramatic effect is not useful if you cannot roughly repeat it.
Know when to repair and when to continue
A bloom is not automatically a mistake. If its edge supports cloud, foliage, smoke, or reflected light, keep it. If it interrupts an important shape, let the page dry fully, soften the edge with a barely damp brush, and reconnect the area with one quiet glaze. Aggressive scrubbing damages the paper surface and attracts more attention.
End each practice page with a small painted scene that uses one wash, one glaze, and three different edge types. Over thirty days, these modest studies create a reliable library of cause and effect. Luminous watercolor is less about controlling every movement than about setting the right conditions—and recognizing when the paint has already done enough.